

I am in love with Jenn's winning Yellow and Grey Dress! So cute!

And that Military Ensemble from Creative Mommas was adorable too!

My creation was the palazzo pants.


I called them that after seeing a million of these on Project Runway Season 8... seriously, they were everywhere! So I had to make a pair for Miss Livi Lu.
I was actually amazed at how easy they were to make. I searched the blogging world for high waisted wide leg trousers and figured I could find out how they were constructed and size them down for my tot. I was a bit worried about the competition because I had waited until the last minute to get started because I still felt crummy from the lingering flu and pants aren't always the easiest thing to make. Throw in the fact that I have to draft my pattern myself and you've got a guaranteed failure. Right?
But then I stumbled upon The Charlotte Letters's Sailor Pants tutorial and this girl saved my day! Let me just brag on her for a sec. First off, she's got an etsy shop where she sells her items. You can tell by looking at them that they are quality made but they are still very reasonably priced!! But what amazes me is that she offers patterns and tutorials to these very same items for FREE on her blog! That's crazy! So definitely go check out her blog and shop!!
The tutorial for the sailor pants is really quite simple. You're basically just going to trace a pair of pants that fit the child and add 2 inches to the top and outside seam. Sew a pleat on each side and put them together like any other pair of pants! No really... it's that simple.
Check it out...
First trace your pants:

Then draw your pleat lines:

Now that you finished your pattern you can make your pants!
Put your pattern on your material and place the outside seam of your pattern on the fold of your fabric. Cut 2 of these and transfer the pleat lines to the wrong side of your fabric and you're ready to sew!

NOTE: The first time I did this I didn't realize I should cut on the fold and only cut 2... instead I cut 4 total. This will still work but you'll have a seam going down each leg. This isn't a big deal but palazzo pants are suppose to be kind of drapey and a seam would make the legs a bit stiff. Plus... you can cut out 2 seams by cutting it this way!! Shortcut!!
Before you sew your pants together you want to sew your pleats. Fold your pant leg (right side to right side) on the middle line and match up the first and third line. Pin in place (or don't if you're lazy like me) and sew from top to the bottom of your pleat line. Then repeat for the other leg!

Now if you know how to sew together a pair of pants, go ahead girl and do your thing!
If not, it's cool, I'll walk you through it. It's super simple but it's easy to get lost in the words and get confused about what the heck your doing! My first pair of pants were absolutely hilarious... seriously I think I sewed the legs shut or something like that. But hey... that's what seam rippers are for!!
Okay so take 1 of your pant legs and fold it so the right sides are in and your looking at the inside of the fabric. You are going to sew the leg from the crotch all the way to the bottom of the leg. Now... do NOT sew past the crotch or you'll end up with 2 really long leg warmers... in fact they'll look just like chaps... don't do it!

Repeat for the other leg.
Now you should have 2 funny looking pant legs. Take one of them and turn it right side out and wiggle it inside of the other pant leg. You'll want to make sure you've got both of the pleats touching right side to right side.

Another note: I took this picture after I finished the pants and realized this shot would be good for explaining how to get from here to there!
If this totally confuses you don't fret. Try taking a look at a pair of pants that are already made... the ones you used to trace your pattern maybe! Turn the pants right side in and then stuff one of the legs inside the other... make sense now?
Now you are going to sew the legs together. Match up the 2 crotch seams (and pin if you aren't too lazy) and sew from the front waist to the crotch to the back waist.

Again this pic was taken after the pants were finished.
Now you can pull your pants right side out and you should be able to see a basic pair of pants!! Woohoo! You did it!
Try them on her and see how they fit if you'd like but fair warning... they're gonna be HUGE!
You still need to sew in your elastic!
So fold down the top of your pants about 1 and sew in place. Cut your elastic to the right size... The Charlotte Letters has a simple solution for figuring this measurement out but sometimes even simple math makes my head hurt so I opted instead to chase the little girl around and stretch the elastic across her back side. Either way get your elastic and sew it into place!
Pin your little pants to mark the sides of the pants. Sew one end of your elastic to one side of your pants. Then stretch your elastic and meet the other end of your elastic to the other side of your pants. It's going to look crazy... don't worry!
Now fold the top of your pants down again to cover your elastic. Now sew it in place while stretching out your elastic.

Now all you've got left is the bottom hem and embellishments!
If my denim fabric would have been darker I would have put the faux sailor flap and buttons on them and paired it with a nautical striped shirt and Livi's red shoes.
Something like this...

But the denim was lighter and it inspired me to go a little more Gretchen, so I opted instead for a paperbag trouser look and made a tie for the waist... like these from Anthropologie.
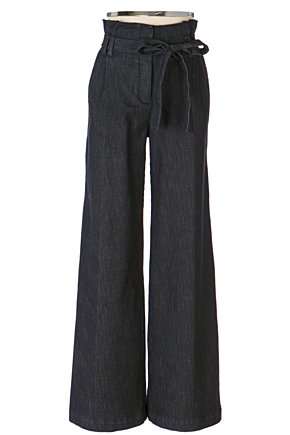
Cute huh?
So how will your little fashionista wear hers?
Thanks for the shout out! I love seeing your inspiration photos. I was a dimwit and didn't take photos along the way to do a tutorial. But... I found a similar shirt and a skirt that I'm going to make another one for Arden and take the tutorial pics. Just don't know how quickly I'll be able to get it done - working on Week 2's project!
ReplyDeleteThanks for putting up the tutorial! I love these and am so making a pair for my little one! I will link it to the page as well!
ReplyDeleteThese came out so cute! I want a pair...i actually have some pants in the closet I was thinking of getting rid of but I may be able to make it work. I am so impressed you were able to make a tutorial with the flu! I wasn't even sick!...it was my kids and I just didn't have the time to make a tutorial.....I mean I actually didn't even finish the project and that was without the tutorial! Not this week though! I am finishing early...been working on it since earlier! I will make sure to get good pics this time! I can't wait to see what you and everyone else is doing for this weeks project! And just an fyi I am having two giveaways this week...one Wed & one Sat...so stop by if you have a chance!
ReplyDeleteAMAZING!!!! i want a pair!!!
ReplyDeleteyou are going on our side bar asap!
~selina
LOVE THESE PANTS! I want them in my size!! Are there patterns for these pants in womens sizes?! How would I shart my own pattern that looks like the anthropologie pant?
ReplyDeleteAlisha
I would like to know how to do them in womens sizes also.
Delete"The first time I did this I didn't realize I should cut on the fold and only cut 2... instead I cut 4 total. This will still work but you'll have a seam going down each leg. This isn't a big deal but palazzo pants are suppose to be kind of drapey and a seam would make the legs a bit stiff. Plus... you can cut out 2 seams by cutting it this way!! Shortcut!! "
ReplyDeletei dont understand this. could you please explain it a bit further?
thanks!